1
/
of
5
lillyelectronics
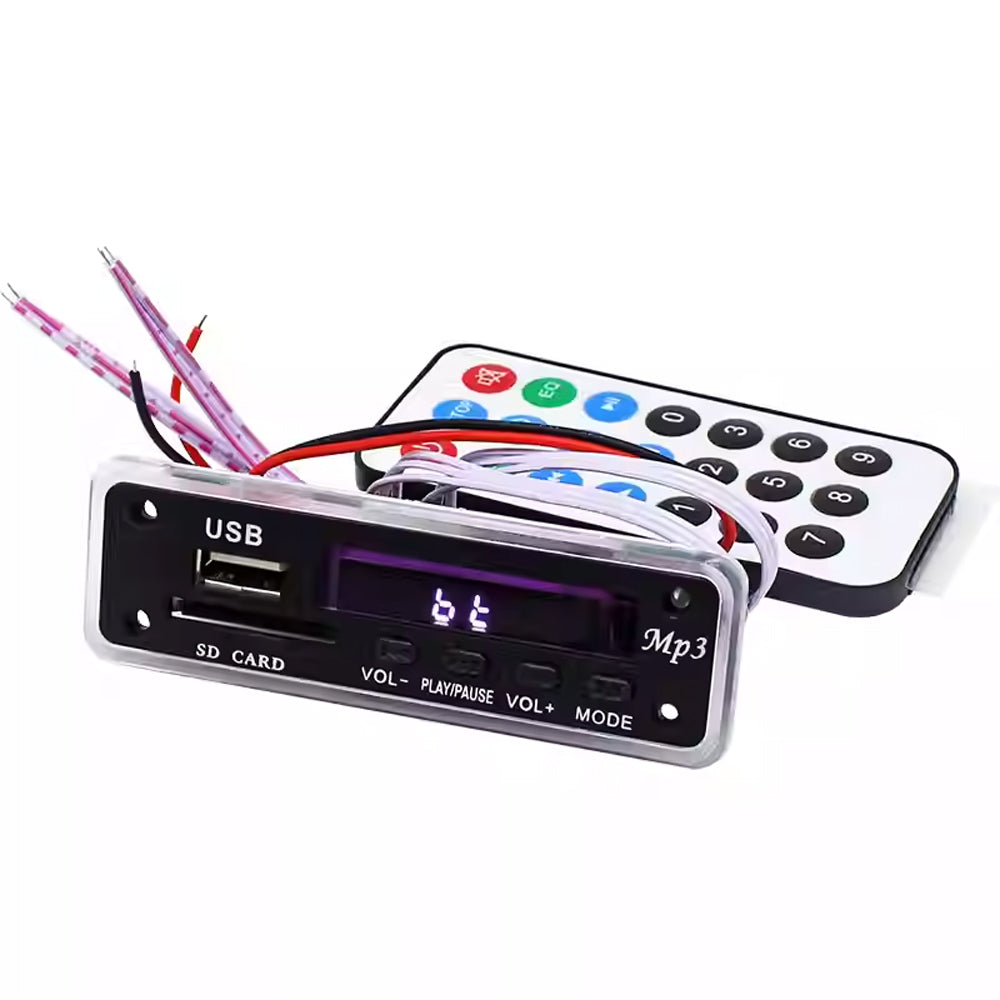
5V 12V MP3 Decoding Board Module FM/USB /Audio Decoding Board (SD Card Slot)
5V 12V MP3 Decoding Board Module FM/USB /Audio Decoding Board (SD Card Slot)
Regular price
$23.00
Regular price
$27.00
Sale price
$23.00
Unit price
/
per
Shipping calculated at checkout.
Couldn't load pickup availability
12V für Bluetooth USB Sound Card Reader Lossless Decoding Board für FLAC WAV WMA & MP3 Audio Development Kit
Specifications:
The new model is launched with blue background white separation characters, supporting network radio stations, and customizable sound quality adjustment in 7 frequency bands; Panel length 9.3cm * height 3cm * depth 2.7cm; installation opening: 8.3 * 2.3 * 2.7 (depth) cm, leaving 6mm diameter screw positions at the upper and lower corners of both ends; Panel screw hole spacing: 7.4 * 1.6cm; power supply voltage: choose one of the two power inputs to avoid connecting both at the same time; 12V is a red seat DC straight 9-current 7V-12V; The 5V is connected from the back of the board via a mini USB, and the DC voltage of 4V-5V cannot exceed 5V. It can be used directly (the mini USB MICRO plug is convenient and practical to plug in). Cannot connect to any AC voltage value;
Module features:
1. Sound effects can be customized and adjusted
2. Support online radio stations
3. Supports Bluetooth+APP control and hands-free calling (when you hear a "beep beep" or press pause to answer the call when reporting). Phone call back: continuously press the pause button in Bluetooth mode to call back the last call number,
4. Support folder selection and playback - convenient for different music categories to choose and play. Store music categories in different folders on SD cards/disks; Long press the MODE key in playback mode to select folder playback (while F001, F002,... will appear on the screen)
5. Loop mode: Press the "arrow" or "RPT" while in playback mode. Symbol keys: Random (RAN)/Single Loop (ONE)/Folder Loop (FOL)/Full Loop (ALL); If you press (FOL) in the current folder, the entire song will be played in a loop only in that folder
6. Supports switching between USB/card/Bluetooth/FM/AUX. Conversion prompt and caller ID (voice shipping defaults to Chinese)
7. Supports MP3/WMA/WAV/FLAC/APE format music. (When downloading music, you should download it from a legitimate website with complete source code, and also pay attention to checking the properties of the music; otherwise, if the source code is incomplete or incorrect, there may be issues such as inability to play, lagging, or jumping.)
8. Support USB/card switching, previous track, next track, volume adjustment EQ、 Play/pause, stop, repeat single, mute, turn off, select song directly.
9. Supports Bluetooth up and down songs, volume adjustment, play/pause, and mute.
10. Support power-off memory function: (The function mode also comes with memory, which remembers the mode before power-off)
Note: For non smartphones (Android system), password -0000 is required; Product Bluetooth Device Name M01BT69
APP installation and usage instructions:
Notes:
When using the Bluetooth app, please turn off the phone's own player, and also use the app to pause playback and select songs (without panel buttons or remote control); Otherwise, there will be a phenomenon of playing two pieces of music at the same time: in addition, because the APP's function requires Bluetooth to be constantly turned on
1. When the phone receives a message in the APP mode, some phones will directly jump to Bluetooth and need to manually switch back to the current mode.
2. Switching from Bluetooth to other modes requires manual connection operation on the phone when returning to Bluetooth.
Operation steps:
1) First, search for "Jelly Home" in the mobile app market (such as "App Store"), click to download and install it on your phone;
2) Press the MODE key on the decoding board to switch to Bluetooth, and you will also hear a beep, beep, or prompt sound. The phone should also enable Bluetooth detection so that it can be detected by the device. Then go to the Bluetooth menu - Search for Devices or Paired Devices, and find (MO1BT69) "Touch Pairing". You will also hear a beep sound to complete pairing; Not for smartphones (Android system), password -0000 is required, product Bluetooth device name MO1BT69;
3) Return to the mobile app interface, click on the software to open it, select the device, add the device, scan and search for "MOBT69", and click connect.
4) Return to the APP interface and select the corresponding mode (USB/TF supports folder directory).
5) You can choose the corresponding network radio station that is currently broadcasting.
6) Custom adjustment of 7th band frequency for sound effects: Click on sound effects - select custom (slide interface - from leftmost to rightmost 31 to 16K, each frequency can be adjusted by dragging up and down to the desired value).
Notes:
Special attention one:
1) Working voltage 12V: DC 7V-12V, 5V: 3.7V-5V (mini USB MICR0 plug in), current 800MA-1A. Insufficient current may cause phenomena such as jumping, malfunctioning remote control, or inability to read Bluetooth (please check your power supply if this problem occurs); The voltage should not exceed the maximum value of the required voltage range for the product, otherwise it will damage the main chip and related components.
2) The module power ground and signal ground are separate, and there is a separate resistor to facilitate the selection and use of different amplifiers (see the 0 ohm resistor on R32 on the board). They are now shipped and connected together using 0 ohms. Individual amplifiers may produce noise. It is recommended to use a separate power supply to power the decoding board when using it. If using the same power supply as the amplifier, please first connect the audio output ground of the decoding board to the power ground (the 0 ohm resistor of R32 for "AGND" and "GND") before wiring (operate with the power off); If you have any questions about wiring or other issues that are unclear or difficult to handle, please feel free to contact us at any time
Special attention two:
Attention to car modification
1) Power supply: Do not directly connect the power supply to the battery, cigarette lighter, and car lock. There are precedents of unstable voltage in these three areas causing damage to the board, and some cars may cause interference. Be careful!! Please connect the stabilized and rectified power supply (usually 8-10V) inside the CD or cassette player. The 12V electricity marked on the car, including the column electricity behind the CD iron shell, is not yet stabilized and rectified; Remember!!; If you are unable or unable to find the corresponding power source, please contact us
2) If you are unsure which line is the audio input when searching for the audio signal line in the CD player during car modification, it is recommended to connect a 10UF electrolytic capacitor to each of the left and right audio output lines of the decoding board to protect the decoding audio output module
Special attention three:
Attention to home modification
power supply
A: It should be noted that the one connected from the original power amplifier is the rectified DC power supply of the power amplifier; Never directly connect the power supply at the transformer or before rectification. The electricity at the transformer or before rectification is still AC, and the router is also AC. You cannot directly supply power to the decoding board, as this will burn out the product
B: The power supply requires full wave rectification, and the filter has a capacitor of over 1000UF to supply power to the decoding board. If the power supply with poor filtering has a direct impact on the sound quality of both reception and decoding, regarding the issue of car audio interference (common ground type phenomenon), depending on the condition of the car, the following measures can be taken:
C: If the power is not taken from the CD circuit, a DC-DC isolated power supply can be added. D: Add a 1:1 isolated audio transformer (note that it is an audio specific transformer) to the audio output.
E: Connect BA3121 circuit (noise reduction circuit)
Special attention four:
Principle of audio wiring for car and home modification: A. Audio cable connection on the circuit board: The decoding board's audio output "R-OUT/GND/Er L-OUT" is connected to the corresponding audio input "R-IN/GND Er IN" of your amplifier; Then the audio source on your original amplifier needs to be disconnected, and the audio output of the non decoding board and the audio source of the original amplifier should be connected in parallel to the amplifier at the same time. This will burn out the chip or other components when powered on; If you need to connect other audio sources, you must connect the signal of that audio source to the audio input of the decoding board. Remember!! B、 Connect with 3.5 audio cable: Connect the audio output "R-0UT/GND/L-OUT" on the decoding board directly with the "3.5 audio cable" and plug it into the "AUX" hole of your amplifier or car. This is the simplest and most convenient wiring method, and it is recommended to use this method
Principle of audio wiring for car and home modification: A. Audio cable connection on the circuit board: The decoding board's audio output "R-OUT/GND/Er L-OUT" is connected to the corresponding audio input "R-IN/GND Er IN" of your amplifier; Then the audio source on your original amplifier needs to be disconnected, and the audio output of the non decoding board and the audio source of the original amplifier should be connected in parallel to the amplifier at the same time. This will burn out the chip or other components when powered on; If you need to connect other audio sources, you must connect the signal of that audio source to the audio input of the decoding board. Remember!! B、 Connect with 3.5 audio cable: Connect the audio output "R-0UT/GND/L-OUT" on the decoding board directly with the "3.5 audio cable" and plug it into the "AUX" hole of your amplifier or car. This is the simplest and most convenient wiring method, and it is recommended to use this method
Share
No reviews