

1
/
of
7
Lilly Electronics
ZY-DTS8 DTS AC3 7.1 Channel Decoders Decode Board with Tone Control
ZY-DTS8 DTS AC3 7.1 Channel Decoders Decode Board with Tone Control
Regular price
$218.00
Regular price
$239.00
Sale price
$218.00
Unit price
/
per
Shipping calculated at checkout.
Couldn't load pickup availability
Specification:
1.1 fiber input, 2 coaxial digital signal input
Let you connect more than one audio device more convenient
2.1 road simulation, can be converted to 7.1 by the internal analog output, the same input to get a different effect.
3. A set of 7.1-channel balanced audio signal output
4. With a variety of listening modes to choose from: 2.1 mode; 5.1-channel mode, 7.1-channel mode.
Pink noise test mode! Pink noise test Pink noise test mode allows you to be more accurate, fast points
Identify the sound field positioning.
5 source code format display, such as the input is DTS signal source, the liquid crystal display "DTS"! If the input source is Dolby AC3 format, the liquid crystal display "AC3"! If the input is LPCM signal source LCD "LPCM"! No signal input LCD "" (blank)! No analog signal input will automatically mute, will greatly improve the signal to noise ratio!
6. The use of imported high quality with 30db amplifier gain 8-channel volume control chip
7: Volume section range 80db, each step 1db
8: There are total volume adjustment (8-channel simultaneous adjustment) 0db ~ -80db and a channel independent adjustment function, each channel independently adjustable range 0db ~ -15db
9: volume mute function
10: 7 EQ tone function
7 paragraph EQ pitch adjustment range: -10db ~ + 10db 7-stage adjustment frequency are: 57HZ; 134HZ; 400HZ; 1000HZ; 2200HZ; 6300HZ; 16000HZ!
0. With volume storage function, once set up the various functions will be stored, the next boot will follow the last set parameters to play! ! Once and for all! ! (Set the volume value, no operation command input automatically save the volume after 5 seconds to set the value, power-down data is not lost!)
15: with full remote control easy operation
16: manual control function; easy to use the decoder board without losing the remote control
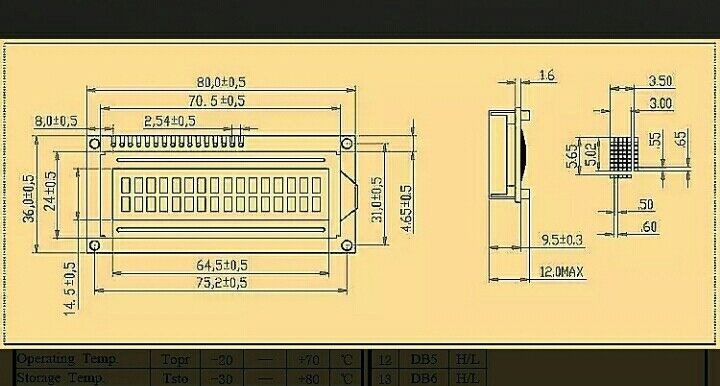
17: 1602 LCD screen as a display, liquid crystal display in English. LCD screen for the blue backlight white font! Nice!
18: Mounting hole M3. Decoding board size is 13.6cm * 11.6cm,
19: The decoder board power supply for the three groups of DC voltage. Respectively: 3-wire + 12V; GND; -12V. Current 1A; Single + 5V; Current 3A or more
20: Want to contact the owner is not online
①. installation instructions
1: The decoder board +12 V logo, then DC +12 V voltage! The decoder board -12V flag, then DC -12V voltage! , Another GND mark ground line, + 5V sign orders + 5V AC and DC voltage.
2: The control panel knob installed in the amplifier volume control potentiometer position and screwed well, the remote control receiver mounted on the panel, the receiving surface of the hemispherical receiver exposed outside the chassis in order to receive the remote control transmitter signal! The LCD screen is fixed in the prominent position of the amplifier panel for observation!
3: "FL" is the front left channel audio output in the output part of the volume board, "FR" is the front right channel audio output, "SL" is the surround left channel audio output, "SR" is Surrounds the right channel audio output, "CEN" indicates the center channel audio output, "SW" indicates the subwoofer channel audio output, "RL" indicates the front left surround channel audio output, and "RR" indicates the front Right surround channel audio output
4: The "AUX L" mark in the signal input part of the volume board is the analog left channel audio input, the "AUX R" mark is the analog right channel audio input, and the decoder board "COX1" is coaxial 1 digital audio input. "COX2 "Sign for coaxial 2 digital audio input," OPT1 "sign for optical digital audio input,
②. LCD character description
1: The coding format of the input signal is displayed at the far right of the first line after the signal is input. "DTS" is displayed when the input audio signal is a DTS audio signal; "AC3" is displayed when the input audio signal is a Dolby AC3 audio signal; "PCM" is displayed when other audio signal is input; LPCM "is blank when no audio signal is input (no character display)
③. manual instructions
1: The default control panel volume tuning state, then adjust the volume knob to adjust the volume! Clockwise as the volume increases, counterclockwise to reduce the volume!
2: Press the knob button to switch the function! The order is:
Vol: Unified volume adjustment; Input: audio input switch; MODE: listening mode switch; DSP: digital sound field switching; front left channel FL volume adjustment; FR front right channel volume adjustment; SL time-lapse: surround SL sound Channel delay time adjustment; surround left channel SL volume adjustment; surround right channel SR volume adjustment; CENTE time-lapse: center channel delay time adjustment; center channel CEN volume adjustment; bass volume adjustment SW; Front left surround channel RL volume adjustment; front right surround channel RR volume adjustment; TONE pitch switch control; FL channel 57HZ adjustment; FL channel 134HZ adjustment; FL channel 400HZ adjustment; FL channel 1kHZ adjustment; FL channel 2.2kHZ adjustment FL channel 6.3kHZ adjustment FL channel 16kHZ adjustment FR channel 57HZ adjustment FR channel 134HZ adjustment FR channel 400HZ adjustment FR channel 1kHZ adjustment FR channel 2.2kHZ adjustment FR sound Road 6.3kHZ regulation; FR channel 16kHZ regulation; CEN channel 57HZ regulation; CEN channel 134HZ regulation; CEN channel 400HZ regulation; CEN channel 1kHZ regulation; CEN channel 2.2kHZ regulation; CEN channel 6.3kHZ regulation; CEN Channel 16kHZ regulation; SL channel 57HZ regulation; SL channel 134HZ regulation; SL sound Road 400HZ regulation; SL channel 1kHZ regulation; SL channel 2.2kHZ regulation; SL channel 6.3kHZ regulation; SL channel 16kHZ regulation; SR channel 57HZ regulation; SR channel 134HZ regulation; SR channel 400HZ regulation; SR sound Channel 1kHZ adjustment SR channel 2.2kHZ adjustment SR channel 6.3kHZ adjustment SR channel 16kHZ adjustment RL channel 57HZ adjustment RL channel 134HZ adjustment RL channel 400HZ adjustment RL channel 1kHZ adjustment RL sound Channel 2.2kHZ adjustment RL channel 6.3kHZ adjustment RL channel 16kHZ adjustment RR channel 57HZ adjustment RR channel 134HZ adjustment RR channel 400HZ adjustment RR channel 1kHZ regulation RR channel 2.2kHZ regulation RR Channel 6.3kHZ adjustment; RR channel 16kHZ adjustment; FL channel 57HZ adjustment; SW channel 134HZ adjustment; SW channel 400HZ adjustment; SR time-lapse: Surround SR channel delay time adjustment; FL time-lapse: FL FR time-lapse: FR channel delay time adjustment; SW time-lapse: SW channel delay time adjustment; RL time-lapse: RL channel delay time adjustment; RR time- lapse: RR channel around the delay (each press the switch, channel switching a corresponding function selected to flash! )
3: Input: switch the state of input of audio source, at this time, adjust the knob to select 6 channels of audio source in sequence: "OPT"; "COX 1"; "COX 2"; "AUX"
4: MODE: Listen for the mode switching status. At this time, adjust the knob to select 4 modes in sequence: "2.1" mode; "5.1" mode; "7.1" mode; "TEST" pink noise test mode
5: DSP EFFECT: Digital sound field mode switching state, then adjust the knob to select the 9 kinds of sound field mode in turn: "MATRIX"; "STEREO"; "PLII MOVIE"; "PLII MUSIC"; "NEO 6 CINEMA"; "NEO 6 MUSIC ";" HALL ";" THEATER ";" ROOM "
6: front left channel FL volume adjustment status, then adjust the knob to adjust the volume of the size! Clockwise as the volume increases, counterclockwise to reduce the volume!
7: Front right channel FR volume adjustment status, then adjust the knob to adjust the volume of the size! Clockwise as the volume increases, counterclockwise to reduce the volume!
8: REAR time-lapse: Surround channel delay time selection state, then adjust the knob to adjust the delay size! Clockwise to increase delay, anti-clockwise to reduce the delay!
9: surround channel SL volume adjustment status, then adjust the knob to adjust the volume of the size! Clockwise as the volume increases, counterclockwise to reduce the volume!
10: surround channel SR volume adjustment status, then adjust the knob to adjust the volume of the size! Clockwise as the volume increases, counterclockwise to reduce the volume!
11: CENTE time-lapse: center channel delay time selection state, then adjust the knob to adjust the delay size! Clockwise to increase delay, anti-clockwise to reduce the delay!
12: Center CEN volume adjustment status, then adjust the knob to adjust the volume of the size! Clockwise as the volume increases, counterclockwise to reduce the volume!
13: bass SW volume adjustment status, then adjust the volume knob to adjust the volume! Clockwise as the volume increases, counterclockwise to reduce the volume!
14: front left surround channel RL volume adjustment status, then adjust the knob to adjust the volume of the size! Clockwise as the volume increases, counterclockwise to reduce the volume!
15: RR front right surround channel volume adjustment state, then adjust the volume knob for the size! Clockwise as the volume increases, counterclockwise to reduce the volume!
16: Vol: unified volume adjustment state, then adjust the volume knob to adjust the volume! Clockwise as the volume increases, counterclockwise to reduce the volume!
Remote control instructions (label see picture)
1: The VOL + button of the remote control is the volume + button (to add the function button to adjust!), The VOL- button is the volume button (to adjust the function button to decrease)
2: The pause button on the remote control is the mute function key, press once to 6-channel mute at the same time, press again to turn on the sound! Cycle switching! (The LCD will display "MUTE" when muted; Unmute display will return to normal!) NOTE: Other functions will not work while muted, and will not be restored until mute is canceled! ! !
3: The remote control 1 key is the front left channel FL selection key. In the front left channel FL state, press VOL- key to front left channel FL volume decrease, press VOL + to front left channel FL volume increase!
4: The remote controller 2 key is the FR front-right channel selection key. In the front right channel FR state, press the VOL- key to change the front right channel FR volume, press VOL + to set the front right channel FR volume increase!
5: The remote control 3 buttons surround the left channel SL selection button, surround the left channel SL state, press the VOL- button to surround the left channel SL volume decrease, press VOL + to surround the left channel SL volume increase!
6: The remote control 4 keys surround the right channel SR selection key, surround the right channel SR state press VOL- key to surround the right channel SR volume decrease, press VOL + to surround the right channel SR volume increase!
7: The remote control 5-button is the center channel CEN select button, the center channel C state press VOL- button for the center channel C volume reduction, press VOL + for the center channel C volume increase!
8: remote control 6 keys for the bass SW adjustment selection keys, subwoofer SW volume control status press the VOL- button to bass SW channel volume decrease, press VOL + for bass SW channel volume increase!
9: Remote control 0 key for the volume adjustment (all channels) selection keys, in all channel status press VOL- for all channel volume reduction, press VOL + for all channel volume increase! (The default is this state! The control panel will return to this state and save the volume value when there is no control command input for 10 seconds)
10: remote control mute button for the mute function control key!
11: Remote control U / SD button for function selection control! Followed by the key to select:
Vol: Unified volume adjustment; Input: audio input switch; MODE: listening mode switch; DSP: digital sound field switching; front left channel FL volume adjustment; FR front right channel volume adjustment; SL time-lapse: surround SL sound Channel delay time adjustment; surround left channel SL volume adjustment; surround right channel SR volume adjustment; CENTE time-lapse: center channel delay time adjustment; center channel CEN volume adjustment; bass volume adjustment SW; Front left surround channel RL volume adjustment; front right surround channel RR volume adjustment; TONE pitch switch control; FL channel 57HZ adjustment; FL channel 134HZ adjustment; FL channel 400HZ adjustment; FL channel 1kHZ adjustment; FL channel 2.2kHZ adjustment FL channel 6.3kHZ adjustment FL channel 16kHZ adjustment FR channel 57HZ adjustment FR channel 134HZ adjustment FR channel 400HZ adjustment FR channel 1kHZ adjustment FR channel 2.2kHZ adjustment FR sound Road 6.3kHZ regulation; FR channel 16kHZ regulation; CEN channel 57HZ regulation; CEN channel 134HZ regulation; CEN channel 400HZ regulation; CEN channel 1kHZ regulation; CEN channel 2.2kHZ regulation; CEN channel 6.3kHZ regulation; CEN Channel 16kHZ regulation; SL channel 57HZ regulation; SL channel 134HZ regulation; SL sound Road 400HZ regulation; SL channel 1kHZ regulation; SL channel 2.2kHZ regulation; SL channel 6.3kHZ regulation; SL channel 16kHZ regulation; SR channel 57HZ regulation; SR channel 134HZ regulation; SR channel 400HZ regulation; SR sound Channel 1kHZ adjustment SR channel 2.2kHZ adjustment SR channel 6.3kHZ adjustment SR channel 16kHZ adjustment RL channel 57HZ adjustment RL channel 134HZ adjustment RL channel 400HZ adjustment RL channel 1kHZ adjustment RL sound Channel 2.2kHZ adjustment RL channel 6.3kHZ adjustment RL channel 16kHZ adjustment RR channel 57HZ adjustment RR channel 134HZ adjustment RR channel 400HZ adjustment RR channel 1kHZ regulation RR channel 2.2kHZ regulation RR Channel 6.3kHZ adjustment; RR channel 16kHZ adjustment; FL channel 57HZ adjustment; SW channel 134HZ adjustment; SW channel 400HZ adjustment; SR time-lapse: Surround SR channel delay time adjustment; FL time-lapse: FL FR time-lapse: FR channel delay time adjustment; SW time-lapse: SW channel delay time adjustment; RL time-lapse: RL channel delay time adjustment; RR time- lapse: RR channel around the delay (each press the switch, channel switching a corresponding function selected to flash! And manually controlled knob press switch function the same)
12: I N: switch the state of the input of the sound source. At this time, the adjusting knob is used to select 4 groups of sound source channels in turn: "OPT"; "COX 1"; "COX 2" "AUX"
13: MODE: Listen for the mode switching status, then press the VOL + key to select 4 modes in sequence: "2.1" mode; "5.1" mode; "7.1" mode; "TEST" pink noise test mode
14: remote control EQ button for the DSP EFFECT digital sound field mode direct selection key! Press the button to select each of the nine sound field modes: "MATRIX"; "STEREO"; "PLII MOVIE"; "PLII MUSIC"; "NEO 6 CINEMA"; "NEO 6 MUSIC"; "HALL"; "THEATER" "ROOM"
15: When the LCD monitor channel volume value does not change during adjustment, it indicates that the function is adjusted to the maximum or minimum! (Maximum 80, minimum 00)
16: Remote control Previous key is the left front surround channel RL select button, press the VOL- button in the front left surround channel RL to front left channel RL Volume decrease, press VOL + to front left channel RL volume increase!
17: The remote control next page key is the front right surround channel RR selection key. In the state of the front right surround channel RR, press the VOL- button to decrease the volume of the front right surround channel RR, press VOL + to the front right surround channel RR volume increase!
18: Remote control 7 button for the front left surround RL select button, in the front surround left channel RL state press VOL- for the front surround left channel RL volume is reduced, press VOL + for the front surround left channel RL volume increase!
19: The remote control 8 key is the front surround right channel RR selection key, the front surround right channel RR state Press the VOL- key for the front surround right channel RR volume decrease, press VOL + for the front surround right channel RR volume increase!
20: Want to contact the owner is not online
Vol: Unified volume adjustment; Input: audio input switch; MODE: listening mode switch; DSP: digital sound field switching; front left channel FL volume adjustment; FR front right channel volume adjustment; SL time-lapse: surround SL sound Channel delay time adjustment; surround left channel SL volume adjustment; surround right channel SR volume adjustment; CENTE time-lapse: center channel delay time adjustment; center channel CEN volume adjustment; bass volume adjustment SW; Front left surround channel RL volume adjustment; front right surround channel RR volume adjustment; TONE pitch switch control; FL channel 57HZ adjustment; FL channel 134HZ adjustment; FL channel 400HZ adjustment; FL channel 1kHZ adjustment; FL channel 2.2kHZ adjustment FL channel 6.3kHZ adjustment FL channel 16kHZ adjustment FR channel 57HZ adjustment FR channel 134HZ adjustment FR channel 400HZ adjustment FR channel 1kHZ adjustment FR channel 2.2kHZ adjustment FR sound Road 6.3kHZ regulation; FR channel 16kHZ regulation; CEN channel 57HZ regulation; CEN channel 134HZ regulation; CEN channel 400HZ regulation; CEN channel 1kHZ regulation; CEN channel 2.2kHZ regulation; CEN channel 6.3kHZ regulation; CEN Channel 16kHZ regulation; SL channel 57HZ regulation; SL channel 134HZ regulation; SL sound Road 400HZ regulation; SL channel 1kHZ regulation; SL channel 2.2kHZ regulation; SL channel 6.3kHZ regulation; SL channel 16kHZ regulation; SR channel 57HZ regulation; SR channel 134HZ regulation; SR channel 400HZ regulation; SR sound Channel 1kHZ adjustment SR channel 2.2kHZ adjustment SR channel 6.3kHZ adjustment SR channel 16kHZ adjustment RL channel 57HZ adjustment RL channel 134HZ adjustment RL channel 400HZ adjustment RL channel 1kHZ adjustment RL sound Channel 2.2kHZ adjustment RL channel 6.3kHZ adjustment RL channel 16kHZ adjustment RR channel 57HZ adjustment RR channel 134HZ adjustment RR channel 400HZ adjustment RR channel 1kHZ regulation RR channel 2.2kHZ regulation RR Channel 6.3kHZ adjustment; RR channel 16kHZ adjustment; FL channel 57HZ adjustment; SW channel 134HZ adjustment; SW channel 400HZ adjustment; SR time-lapse: Surround SR channel delay time adjustment; FL time-lapse: FL FR time-lapse: FR channel delay time adjustment; SW time-lapse: SW channel delay time adjustment; RL time-lapse: RL channel delay time adjustment; RR time- lapse: RR channel around the delay (each press the switch, channel switching a corresponding function selected to flash! And manually controlled knob press switch function the same)
12: I N: switch the state of the input of the sound source. At this time, the adjusting knob is used to select 4 groups of sound source channels in turn: "OPT"; "COX 1"; "COX 2" "AUX"
13: MODE: Listen for the mode switching status, then press the VOL + key to select 4 modes in sequence: "2.1" mode; "5.1" mode; "7.1" mode; "TEST" pink noise test mode
14: remote control EQ button for the DSP EFFECT digital sound field mode direct selection key! Press the button to select each of the nine sound field modes: "MATRIX"; "STEREO"; "PLII MOVIE"; "PLII MUSIC"; "NEO 6 CINEMA"; "NEO 6 MUSIC"; "HALL"; "THEATER" "ROOM"
15: When the LCD monitor channel volume value does not change during adjustment, it indicates that the function is adjusted to the maximum or minimum! (Maximum 80, minimum 00)
16: Remote control Previous key is the left front surround channel RL select button, press the VOL- button in the front left surround channel RL to front left channel RL Volume decrease, press VOL + to front left channel RL volume increase!
17: The remote control next page key is the front right surround channel RR selection key. In the state of the front right surround channel RR, press the VOL- button to decrease the volume of the front right surround channel RR, press VOL + to the front right surround channel RR volume increase!
18: Remote control 7 button for the front left surround RL select button, in the front surround left channel RL state press VOL- for the front surround left channel RL volume is reduced, press VOL + for the front surround left channel RL volume increase!
19: The remote control 8 key is the front surround right channel RR selection key, the front surround right channel RR state Press the VOL- key for the front surround right channel RR volume decrease, press VOL + for the front surround right channel RR volume increase!
20: Want to contact the owner is not online
Package:
1x DTS AC3 7.1 Channel Decoders Decode Board With Tone Control
(Battery is not included because of clearance,battery model is CR2025)
On Jul 16, 2026 at 00:52:14 PDT, seller added the following information:
Share
No reviews